Difference between revisions of "OtfSettings"
| Line 4: | Line 4: | ||
== Overview == | == Overview == | ||
| − | The '''OTF Settings''' enable you to configure the default settings for the working environment of the OTF. You can configure the general settings such as | + | The '''OTF Settings''' enable you to configure the default settings for the working environment of the OTF. You can configure the general settings such as establishing the default location for your OTX solutions, or enabling the function to restore the last opened solution and procedures, or changing the development platform ect. |
You can access the OTF Settings by selecting the "'''File'''" tab of the [[OtfMenuBar|Ribbon]] and then selecting the "'''Options'''" entry, the OTF Options dialog box will be displayed to configure the OTF settings. The OTF Options dialog box contains several pages that are accessed through tabs on the left-hand side. By clicking a tab on the left pane (e.g. "'''General'''", "'''OTX Runtime System'''" ect.) you can access the corresponding settings page on the right pane. You can adjust the settings in many pages and click "'''OK'''" button, and all the changes will be saved. | You can access the OTF Settings by selecting the "'''File'''" tab of the [[OtfMenuBar|Ribbon]] and then selecting the "'''Options'''" entry, the OTF Options dialog box will be displayed to configure the OTF settings. The OTF Options dialog box contains several pages that are accessed through tabs on the left-hand side. By clicking a tab on the left pane (e.g. "'''General'''", "'''OTX Runtime System'''" ect.) you can access the corresponding settings page on the right pane. You can adjust the settings in many pages and click "'''OK'''" button, and all the changes will be saved. | ||
| Line 14: | Line 14: | ||
| style="vertical-align:top; text-align:justify;"| | | style="vertical-align:top; text-align:justify;"| | ||
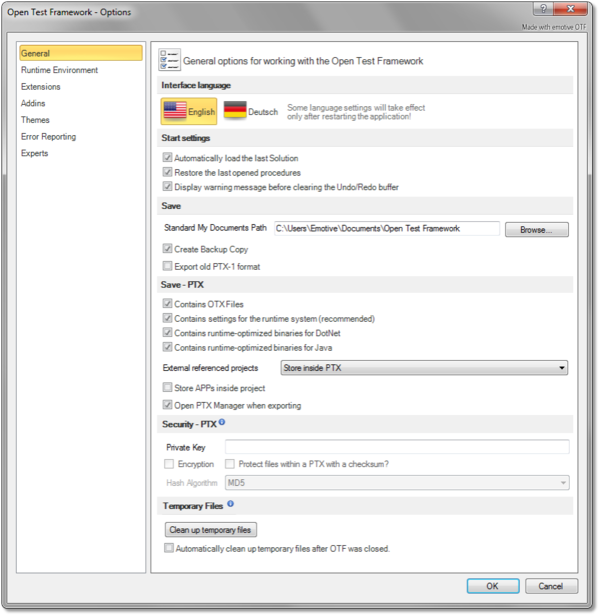
In this page contains the following sections which allows you to customize general settings for the working environment of the OTF: | In this page contains the following sections which allows you to customize general settings for the working environment of the OTF: | ||
| − | + | ||
| − | + | === Interface language === | |
| + | In this section, you can select the display language in the OTF. The default is "'''English'''". At present, the OTF only allows you to switch between "'''English'''" and "'''Deustch'''" (German). | ||
{{Note|The OTF must be restarted to see the effect of the language change completely.}} | {{Note|The OTF must be restarted to see the effect of the language change completely.}} | ||
| − | |||
| − | |||
| − | + | === Start settings === | |
| − | + | This section allows you to enable or disable loading the last opened solution when starting the OTF. You also can enable or disable restoring the last opened procedures when loading a solution. | |
| + | |||
| + | === Save === | ||
| + | In this section, you can set the default storage location for the OTX solutions. You can also enable or disable creating copy backups of the OTX documents, see the "General" settings page of the [[OtfProjectSettings|Project Settings]]. The check box "Export old PTX-1 format" allows you to export a project into the old version PTX library to use with the older version of OTF. | ||
| + | |||
| + | === Save - PTX === | ||
| + | This section allows you to configure the settings for PTX/PPX library exportation. | ||
| + | |||
| + | Below are the controls in this section with their descriptions (according to their position from top-to-bottom): | ||
| + | |||
| + | {|{{TableHeader}} | ||
| + | |- style="background: gray; color: white; vertical-align:top;'''" | ||
| + | | '''Control''' || '''Description''' | ||
| + | |-{{TableRow1}} | ||
| + | | '''OTX files check box{{TooltipIcon2|(Note: This entry will be checked and disabled if all the remaining check boxes are not checked}}''' || Exports the PTX library with only an OTX folder which contains all OTX files. | ||
| + | |-{{TableRow2}} | ||
| + | | '''Runtime settings check box{{TooltipIcon2|(Note: This entry is always checked with one of the remaining check boxes}}''' || Exports the PTX library with all EMOTIVE specific project settings. | ||
| + | |-{{TableRow1}} | ||
| + | | '''Runtime-optimized binaries for Dotnet check box''' || Exports the PTX library with only an Output folder which contain the already compiled and executable binaries for Dotnet runtime. | ||
| + | |-{{TableRow2}} | ||
| + | | '''Runtime-optimized binaries for Java check box''' || Exports the PTX library with only an JavaOutput folder which contain the already compiled and executable binaries for Java runtime. | ||
| + | |-{{TableRow1}} | ||
| + | | '''Referenced projects combo-box''' || Selects a behavior with externally referenced PTX files. | ||
| + | |-{{TableRow2}} | ||
| + | | '''Store APPs inside project check box''' || Saves the external applications inside the project folder if this check box is checked. | ||
| + | |-{{TableRow1}} | ||
| + | | '''Open dialog when exporting check box''' || Displays the "PTX Export Manager" dialog when exporting the PTX/PPX file. | ||
| + | |} | ||
| + | |||
| + | === Security - PTX === | ||
| + | This section allows you to configure the settings for PTX/PPX library encryption. | ||
| + | |||
| + | Below are the controls in this section with their descriptions (according to their position in the bar from left-to-right and top-to-bottom): | ||
| + | |||
| + | {|{{TableHeader}} | ||
| + | |- style="background: gray; color: white; vertical-align:top;'''" | ||
| + | | '''Control''' || '''Description''' | ||
| + | |-{{TableRow2}} | ||
| + | | '''Private key textbox''' || Specifies a password to encrypt and/or sign the PTX/PPX library. | ||
| + | |-{{TableRow1}} | ||
| + | | '''Encryption check box{{TooltipIcon2|(Note: This control is only enable after entering the private key}}''' || Encrypts the entire PTX/PPX file and it only can be opened by OTX Runtime Api. | ||
| + | |-{{TableRow2}} | ||
| + | | '''Protect ... with a checksum check box{{TooltipIcon2|(Note: This control is only enabled after entering the private key}}''' || Protects the PTX/PPX file against an encrypted checksum and it can be opened with the OTF or the OTX Runtime Api. | ||
| + | |-{{TableRow1}} | ||
| + | | '''Has Algorithm combo-box{{TooltipIcon2|(This control is only enabled if the "Protect ... with a checksum" check box is checked }}''' || Selects the Hash algorithm. | ||
| + | |} | ||
| + | |||
| + | === Temporary Files === | ||
| + | During the design time and run time, the OTF has to create some temporary files. This section allows to clean up these temporary files from your computer, using the "Clean up temporary files" button. You can also enable the function to automatically clean up these files after the OTF is closed by checking the corresponding check box below the clean up button. | ||
| + | |||
| + | <!--Here you can also configure the OTF to save the AdminData as a separate file or as inline data in the OTX documents. | ||
* '''"Sequence Designer"''' | * '''"Sequence Designer"''' | ||
| Line 30: | Line 79: | ||
* '''"XSL Stylesheet Support"''' | * '''"XSL Stylesheet Support"''' | ||
| − | :An OTX document can be viewed in a web browser such as Internet Explorer or FireFox. To achieve this, you must embed a stylesheet in the document. This section will allows you to embed (or clear) the stylesheet in all the documents of the current solution. Remember that you must first copy the "OtxDocumentXslt.zip" archive file into the global program data directory "C:\ProgramData\Emotive\Open Test Framework\" | + | :An OTX document can be viewed in a web browser such as Internet Explorer or FireFox. To achieve this, you must embed a stylesheet in the document. This section will allows you to embed (or clear) the stylesheet in all the documents of the current solution. Remember that you must first copy the "OtxDocumentXslt.zip" archive file into the global program data directory "C:\ProgramData\Emotive\Open Test Framework\" (see [[???]] for more information). |
* '''"ODX Database"''' | * '''"ODX Database"''' | ||
| Line 37: | Line 86: | ||
* '''"Others"''' | * '''"Others"''' | ||
:In this section, you can set the prefix for the copy of an element in the OTF (within the [[OtfSolutionExplorer|Solution Explorer]] or the [[OtfWorkflowDesigner|Workflow Designer]]). Everytime you copy and paste an element, the name of the copy element will be preceded by the prefix. If you do not prefer the prefix, just leave it empty. | :In this section, you can set the prefix for the copy of an element in the OTF (within the [[OtfSolutionExplorer|Solution Explorer]] or the [[OtfWorkflowDesigner|Workflow Designer]]). Everytime you copy and paste an element, the name of the copy element will be preceded by the prefix. If you do not prefer the prefix, just leave it empty. | ||
| + | --> | ||
| style="width:30px;" | | | style="width:30px;" | | ||
| Line 45: | Line 95: | ||
{| | {| | ||
| style="vertical-align:top; text-align:justify;"| | | style="vertical-align:top; text-align:justify;"| | ||
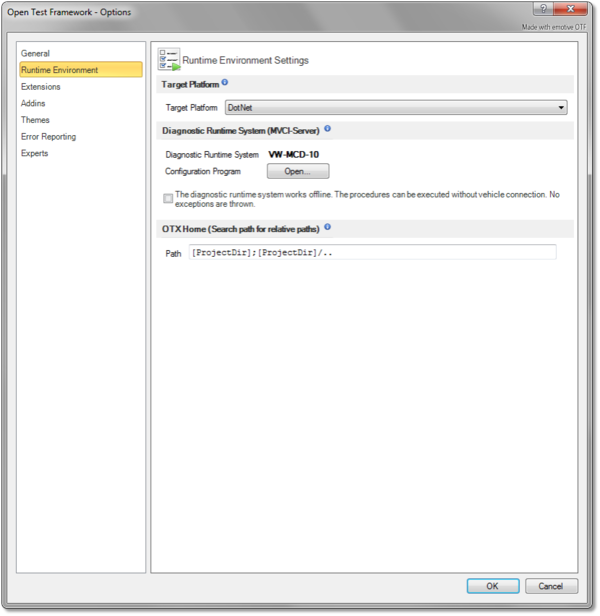
| − | ... | + | This page allows you to set up some settings related to the runtime environment. Below are the sections in this page. |
| + | |||
| + | === Target Platform section === | ||
| + | This section allows to set the target platform for the run time of the OTF. You can select the Dotnet platform or Java platform with the "Target Platform" combo box. | ||
| + | |||
| + | === Diagnostic Runtime System (MVCI-Server) section=== | ||
| + | Here you can find the name of the current Diagnostic Runtime System (MVCI-Server) used for the run time. You can also open the [[MvciConfigProgram| MVCI-Server Configuration Program]] by clicking on the "Open..." button. In the [[MvciConfigProgram| MVCI-Server Configuration Program]], you change current MVCI-Server to another one or modify the current MVCI-Server. The check box of diagnostic runtime system offline working allows to execute the procedure without vehicle connection. No exceptions shall be thrown. | ||
| + | |||
| + | === OTX Home... section === | ||
| + | The OTX search path (OTX-Home) determines the base directory to which all relative path specifications refer. In this section, you can enter the search path in the text box. The OTX search path can contain several directories separated by semicolons (";") and the placeholders "?" (One arbitrary character) and "*" (any characters). You can also use the placeholder "[ProjectDir]" (e.g. "[ProjectDir]/*"). Inside OTF "[ProjectDir]" corresponds to the project directory and in the OTX Runtime API to the directory in which the PTX or OTX or binary file (DLL, JAR) is located. When reading, the runtime environment takes each directory starting from the left as a base for relative paths. If the file is found, the search is canceled. The first directory is used for writing. It shall not contain wildcards. If no OTX search path is specified, the default value is "[ProjectDir];[ProjectDir]/..". | ||
| style="width:30px;" | | | style="width:30px;" | | ||
| − | | style="vertical-align:top; text-align:justify;"| {{ImageStyleCenter| OtfSetting_RuntimeEnvironment.png|600|The "Runtime Environment" page | + | | style="vertical-align:top; text-align:justify;"| {{ImageStyleCenter| OtfSetting_RuntimeEnvironment.png|600|The "Runtime Environment" page helps set up the target platform, the MVCI-Server and the OTX search path}} |
|} | |} | ||
| Line 54: | Line 113: | ||
{| | {| | ||
| style="vertical-align:top; text-align:justify;"| | | style="vertical-align:top; text-align:justify;"| | ||
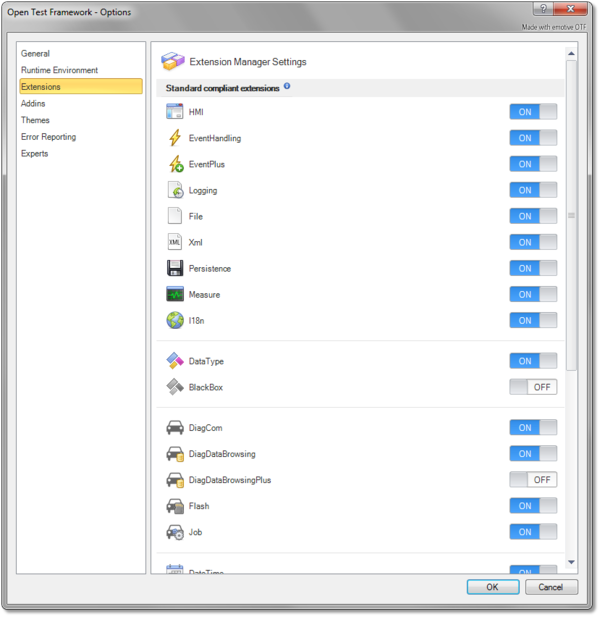
| − | ... | + | In this page, you can find all the supported [[OtxReference#Extensions|OTX extensions]] with their licensing status. Only the full version license enables this page to show all extensions. |
| + | |||
| + | The extensions are classified into 2 groups: Standard compliant extensions and the non-standard compliant extension (user defined extensions). | ||
| + | |||
| + | The extension settings help you hide the unused extensions in design time. To turn on or turn off an extension, please use the switch button at the left most of that extension. If an extension is turned off, the category related to that extension in the [[OtfToolbox|Toolbox]] window shall be hidden, and the related datatype of the turned off extension shall not be displayed when creating or modifying a declaration, and all the entries related to that extension shall not be display in the [[OtfOtlEditor|OTL]] IntelliSense. | ||
| style="width:30px;" | | | style="width:30px;" | | ||
| − | | style="vertical-align:top; text-align:justify;"| {{ImageStyleCenter| OtfSetting_Extensions.png|600|The "Extensions" page | + | | style="vertical-align:top; text-align:justify;"| {{ImageStyleCenter| OtfSetting_Extensions.png|600|The "Extensions" page helps to manage the extensions}} |
|} | |} | ||
| Line 63: | Line 126: | ||
{| | {| | ||
| style="vertical-align:top; text-align:justify;"| | | style="vertical-align:top; text-align:justify;"| | ||
| − | ... | + | An addin (*.'''ota''') is a zipped and encrypted file containing all the necessary files to validate and build PTX/PPX libraries with the particular version OTF code. The addin can only be decrypted and unzipped by the OTF. After that, the addin must be started and used with the Builder Checker program which is described below. |
| + | |||
| + | The '''Addins''' setting page consists of a command bar and a gridview displaying all the added addins. Please not that you can only select one addin at a time, the selected addin can be handled with the buttons in the command bar. | ||
| + | |||
| + | Below are the buttons in this the command bar with their descriptions (according to their position in the bar from left to right): | ||
| + | |||
| + | {|{{TableHeader}} | ||
| + | |- style="background: gray; color: white; vertical-align:top;'''" | ||
| + | | '''Button''' || '''Description''' | ||
| + | |-{{TableRow2}} | ||
| + | | '''Add...''' || Opens a dialog to browse and add a new addin. | ||
| + | |-{{TableRow1}} | ||
| + | | '''Select as default''' || Sets the selected addin as the default addin. The default addin shall be displayed in the default addin combo box in the "Runtime Environment" tab of the Ribbon menu. | ||
| + | |-{{TableRow2}} | ||
| + | | '''Delete''' || Deletes the selected addin. | ||
| + | |-{{TableRow1}} | ||
| + | | '''Open selected Addin...''' || Opens the selected addin in the Builder Checker program. | ||
| + | |} | ||
| + | |||
| + | |||
| + | === Builder Checker program === | ||
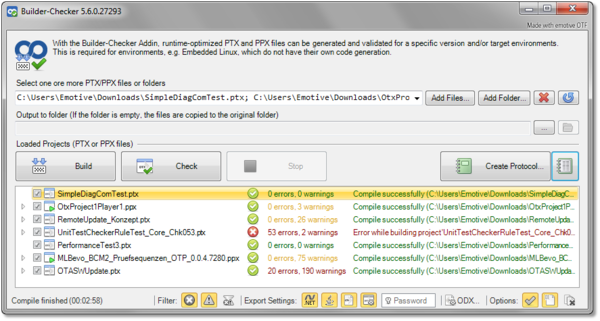
| + | The '''Builder Checker''' program is zipped inside an addin. After the addin is unzipped by the OTF, the Builder Checker program depends on the unzipped files of the addin to run that addin. In short, a Builder Checker is associated with the addin, and can not be seperated with the addin. | ||
| + | |||
| + | With the Builder-Checker Addin, runtime-optimized PTX and PPX files can be generated and validated for a specific version and/or target environments. This is required for environments, e.g. Embedded Linux, which do not have their own code generation. | ||
| + | <!-- | ||
| + | The Builder Checker program has the following controls with their descriptions (according to their positions from left to right and from top to bottom): | ||
| + | |||
| + | {|{{TableHeader}} | ||
| + | |- style="background: gray; color: white; vertical-align:top;'''" | ||
| + | | '''Control''' || '''Description''' | ||
| + | |-{{TableRow1}} | ||
| + | | '''(selected files)''' combo box || Users can manually input paths of the PTX/PPX libraries (or of the folder containing the libraries) here to validate and build in the Builder Checker. This combo box can include many paths to libraries or to containing folder seperated with each other by the colon ";". When the program is started the path collection is empty but you can click to dropdown button and select a last loaded path collection. | ||
| + | |-{{TableRow2}} | ||
| + | | '''Add Files...''' button || Opens a browse window to add one or many PTX/PPX libraries, the new path(s) shall be added to the current path collection of the "selected files" combo box. After adding new path(s), the list of libraries in the "loaded liraries" tree view shall be updated. | ||
| + | |-{{TableRow1}} | ||
| + | | '''Add Folder...''' button || Opens a browse window to add a folder containg libraries, the new path of the folder shall be added to the current path collection of the "selected files" combo box. After adding new path(s), the list of libraries in the "loaded liraries" tree view shall be updated. | ||
| + | |-{{TableRow2}} | ||
| + | | '''Delete''' button || Clears the current path collection in the "selected files" combo box. | ||
| + | |-{{TableRow1}} | ||
| + | | '''Reload''' button || Reloads the list of libraries in the "loaded liraries" tree view. This button should be used when you manually add path(s) in the "selected files" combo box. | ||
| + | |||
| + | |-{{TableRow2}} | ||
| + | | '''Output Folder''' text box || Users can manually input here the output folder for the output (built) PTX/PPX libraries. | ||
| + | |-{{TableRow1}} | ||
| + | | '''Reload''' button || Reloads the li | ||
| + | |-{{TableRow2}} | ||
| + | | '''Delete''' button || Clears the current path collection in the "selected files" combo box. | ||
| + | |-{{TableRow1}} | ||
| + | | '''Reload''' button || Reloads the li | ||
| + | |-{{TableRow2}} | ||
| + | | '''Delete''' button || Clears the current path collection in the "selected files" combo box. | ||
| + | |-{{TableRow1}} | ||
| + | | '''Reload''' button || Reloads the li | ||
| + | |-{{TableRow2}} | ||
| + | | '''Delete''' button || Clears the current path collection in the "selected files" combo box. | ||
| + | |-{{TableRow1}} | ||
| + | | '''Reload''' button || Reloads the li | ||
| + | |-{{TableRow2}} | ||
| + | | '''Delete''' button || Clears the current path collection in the "selected files" combo box. | ||
| + | |-{{TableRow1}} | ||
| + | | '''Reload''' button || Reloads the li | ||
| + | |-{{TableRow2}} | ||
| + | | '''Delete''' button || Clears the current path collection in the "selected files" combo box. | ||
| + | |-{{TableRow1}} | ||
| + | | '''Reload''' button || Reloads the li | ||
| + | |-{{TableRow2}} | ||
| + | | '''Delete''' button || Clears the current path collection in the "selected files" combo box. | ||
| + | |-{{TableRow1}} | ||
| + | | '''Reload''' button || Reloads the li | ||
| + | |-{{TableRow2}} | ||
| + | | '''Delete''' button || Clears the current path collection in the "selected files" combo box. | ||
| + | |-{{TableRow1}} | ||
| + | | '''Reload''' button || Reloads the li | ||
| + | |-{{TableRow2}} | ||
| + | | '''Delete''' button || Clears the current path collection in the "selected files" combo box. | ||
| + | |-{{TableRow1}} | ||
| + | | '''Reload''' button || Reloads the li | ||
| + | |-{{TableRow2}} | ||
| + | | '''Delete''' button || Clears the current path collection in the "selected files" combo box. | ||
| + | |-{{TableRow1}} | ||
| + | | '''Reload''' button || Reloads the li | ||
| + | |-{{TableRow2}} | ||
| + | | '''Delete''' button || Clears the current path collection in the "selected files" combo box. | ||
| + | |-{{TableRow1}} | ||
| + | | '''Reload''' button || Reloads the li | ||
| + | |} | ||
| + | --> | ||
| style="width:30px;" | | | style="width:30px;" | | ||
| − | | style="vertical-align:top; text-align:justify;"| {{ImageStyleCenter| OtfSetting_Addins.png|600|The "Addins" page . | + | | style="vertical-align:top; text-align:justify;"| {{ImageStyleCenter| OtfSetting_Addins.png|600|The "Addins" page allows to manage the addins}} |
| + | |||
| + | |||
| + | |||
| + | {{ImageStyleCenter| BuilderChecker.png|600|The Builder Checker program allows to build and validate a PTX/PPX library with a particular addin}} | ||
|} | |} | ||
Revision as of 10:58, 7 September 2018
UNDER DEVELOPMENT ...
Contents
Overview
The OTF Settings enable you to configure the default settings for the working environment of the OTF. You can configure the general settings such as establishing the default location for your OTX solutions, or enabling the function to restore the last opened solution and procedures, or changing the development platform ect.
You can access the OTF Settings by selecting the "File" tab of the Ribbon and then selecting the "Options" entry, the OTF Options dialog box will be displayed to configure the OTF settings. The OTF Options dialog box contains several pages that are accessed through tabs on the left-hand side. By clicking a tab on the left pane (e.g. "General", "OTX Runtime System" ect.) you can access the corresponding settings page on the right pane. You can adjust the settings in many pages and click "OK" button, and all the changes will be saved.
The introduction and guidelines for each settings page are described briefly in the following sections.
General settings
|
In this page contains the following sections which allows you to customize general settings for the working environment of the OTF: Interface languageIn this section, you can select the display language in the OTF. The default is "English". At present, the OTF only allows you to switch between "English" and "Deustch" (German).
Start settingsThis section allows you to enable or disable loading the last opened solution when starting the OTF. You also can enable or disable restoring the last opened procedures when loading a solution. SaveIn this section, you can set the default storage location for the OTX solutions. You can also enable or disable creating copy backups of the OTX documents, see the "General" settings page of the Project Settings. The check box "Export old PTX-1 format" allows you to export a project into the old version PTX library to use with the older version of OTF. Save - PTXThis section allows you to configure the settings for PTX/PPX library exportation. Below are the controls in this section with their descriptions (according to their position from top-to-bottom):
Security - PTXThis section allows you to configure the settings for PTX/PPX library encryption. Below are the controls in this section with their descriptions (according to their position in the bar from left-to-right and top-to-bottom):
Temporary FilesDuring the design time and run time, the OTF has to create some temporary files. This section allows to clean up these temporary files from your computer, using the "Clean up temporary files" button. You can also enable the function to automatically clean up these files after the OTF is closed by checking the corresponding check box below the clean up button.
|
|
Runtime Environment settings
|
This page allows you to set up some settings related to the runtime environment. Below are the sections in this page. Target Platform sectionThis section allows to set the target platform for the run time of the OTF. You can select the Dotnet platform or Java platform with the "Target Platform" combo box. Diagnostic Runtime System (MVCI-Server) sectionHere you can find the name of the current Diagnostic Runtime System (MVCI-Server) used for the run time. You can also open the MVCI-Server Configuration Program by clicking on the "Open..." button. In the MVCI-Server Configuration Program, you change current MVCI-Server to another one or modify the current MVCI-Server. The check box of diagnostic runtime system offline working allows to execute the procedure without vehicle connection. No exceptions shall be thrown. OTX Home... sectionThe OTX search path (OTX-Home) determines the base directory to which all relative path specifications refer. In this section, you can enter the search path in the text box. The OTX search path can contain several directories separated by semicolons (";") and the placeholders "?" (One arbitrary character) and "*" (any characters). You can also use the placeholder "[ProjectDir]" (e.g. "[ProjectDir]/*"). Inside OTF "[ProjectDir]" corresponds to the project directory and in the OTX Runtime API to the directory in which the PTX or OTX or binary file (DLL, JAR) is located. When reading, the runtime environment takes each directory starting from the left as a base for relative paths. If the file is found, the search is canceled. The first directory is used for writing. It shall not contain wildcards. If no OTX search path is specified, the default value is "[ProjectDir];[ProjectDir]/..". |
|
Extensions settings
|
In this page, you can find all the supported OTX extensions with their licensing status. Only the full version license enables this page to show all extensions. The extensions are classified into 2 groups: Standard compliant extensions and the non-standard compliant extension (user defined extensions). The extension settings help you hide the unused extensions in design time. To turn on or turn off an extension, please use the switch button at the left most of that extension. If an extension is turned off, the category related to that extension in the Toolbox window shall be hidden, and the related datatype of the turned off extension shall not be displayed when creating or modifying a declaration, and all the entries related to that extension shall not be display in the OTL IntelliSense. |
|
Addins settings
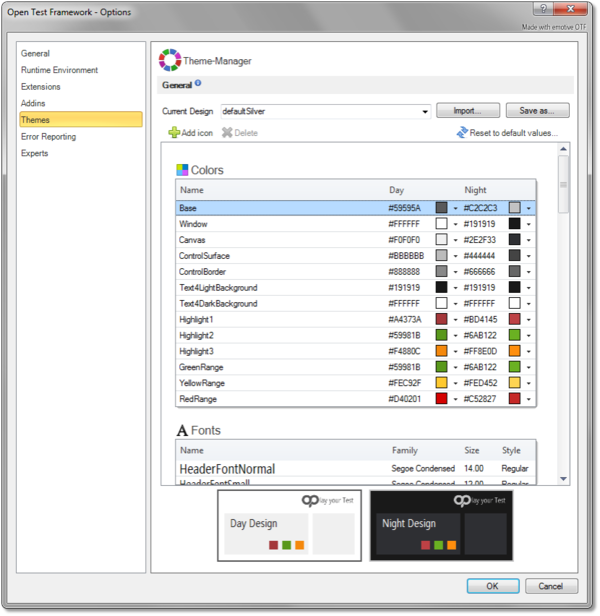
Themes settings
|
... |
|
Error Reporting settings
|
... |
|
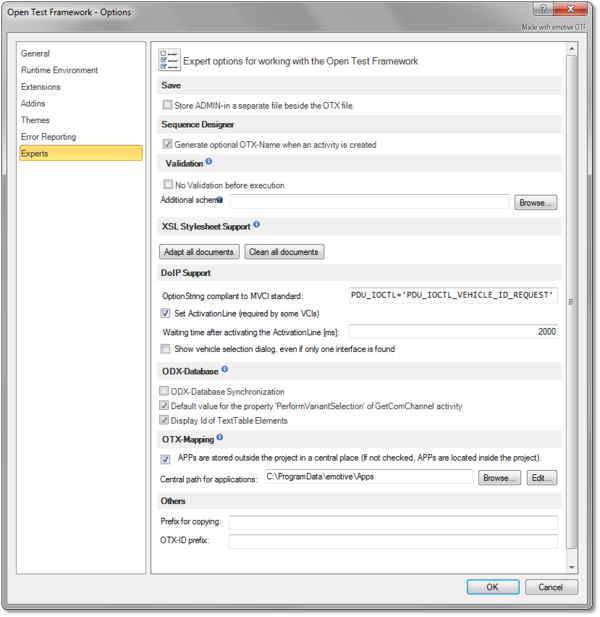
Experts settings
|
... |
|
