Difference between revisions of "OtpFirstSteps"
Jump to navigation
Jump to search
| Line 2: | Line 2: | ||
In this section, we would like to step-by-step help you get started in the Open Test Player. We assume that the OTP is already [[OtpInstallation|installed]] and [[OtpLicensing|activated]]. | In this section, we would like to step-by-step help you get started in the Open Test Player. We assume that the OTP is already [[OtpInstallation|installed]] and [[OtpLicensing|activated]]. | ||
| − | The OTP only supports runtime environment. Please refer the [[OtfFirstSteps#Create_a_player_project_to_execute_it_in_stand_alone_OTP|OTF first steps]] to learn how to create a PPX file to run with the OTP. | + | The OTP only supports runtime environment. Please refer the [[OtfFirstSteps#Create_a_player_project_to_execute_it_in_stand_alone_OTP|OTF first steps]] to learn how to create a PPX file to run with the OTP (if you only works with the OTP, you can skip this reference). |
| − | + | == Start the OTP and load a PPX file == | |
| − | |||
| − | + | [[Image:OtpFirstStepsPage1.png|1000px]] | |
| − | |||
| − | + | == Select the Diagnostic Database to run the PPX == | |
| − | + | Select "None" if you do not want to use the Diagnostic Database. | |
| − | |||
| + | [[Image:OtpFirstStepsPage2.png|500px]] | ||
| − | == | + | == The PPX is loaded and ready for a start == |
| − | |||
| + | [[Image:OtpFirstStepsPage3.png|1100px]] | ||
| − | == | + | == Load the application container (package of dlls to use with OTX Mappings) == |
| − | [[ | + | You can skip this step if your PPX does not use OTX Mappings (click [[OtfOtxMapping|'''here''']] for more information about OTX Mappings). |
| − | |||
| − | [[Image: | + | [[Image:OtpFirstStepsPage4.png|800px]] |
| + | == Switch the protocol creation ON == | ||
| − | |||
| − | [[Image: | + | [[Image:OtpFirstStepsPage5.png|800px]] |
| + | == View the OTX test sequences in graphical workflow == | ||
| − | |||
| − | [[Image: | + | [[Image:OtpFirstStepsPage6.png|800px]] |
| + | == Start the procedure command of PPX == | ||
| + | Please click on the procedure command. | ||
| + | [[Image:OtpFirstStepsPage7.png|1100px]] | ||
| + | == Stop the running procedure command prematurely == | ||
| + | Click on the running procedure command again to finish it prematurely. | ||
| − | + | [[Image:OtpFirstStepsPage8.png|350px]] | |
| − | |||
| − | |||
| − | |||
| − | |||
| − | |||
| + | == Start a playlist command and wait until it completes == | ||
| − | + | [[Image:OtpFirstStepsPage9.png|350px]] | |
| − | |||
| + | == View the result of the playlist execution == | ||
| − | + | [[Image:OtpFirstStepsPage10.png|1100px]] | |
| − | |||
| − | [[Image: | ||
| − | |||
| − | |||
| − | |||
| − | |||
| − | |||
| − | |||
| − | |||
| − | |||
| − | |||
| − | |||
| − | |||
| − | |||
| − | |||
| − | |||
| − | |||
| − | |||
| − | |||
| − | |||
| − | |||
| − | |||
Latest revision as of 13:10, 24 October 2018
In this section, we would like to step-by-step help you get started in the Open Test Player. We assume that the OTP is already installed and activated.
The OTP only supports runtime environment. Please refer the OTF first steps to learn how to create a PPX file to run with the OTP (if you only works with the OTP, you can skip this reference).
Contents
- 1 Start the OTP and load a PPX file
- 2 Select the Diagnostic Database to run the PPX
- 3 The PPX is loaded and ready for a start
- 4 Load the application container (package of dlls to use with OTX Mappings)
- 5 Switch the protocol creation ON
- 6 View the OTX test sequences in graphical workflow
- 7 Start the procedure command of PPX
- 8 Stop the running procedure command prematurely
- 9 Start a playlist command and wait until it completes
- 10 View the result of the playlist execution
Start the OTP and load a PPX file
Select the Diagnostic Database to run the PPX
Select "None" if you do not want to use the Diagnostic Database.
The PPX is loaded and ready for a start
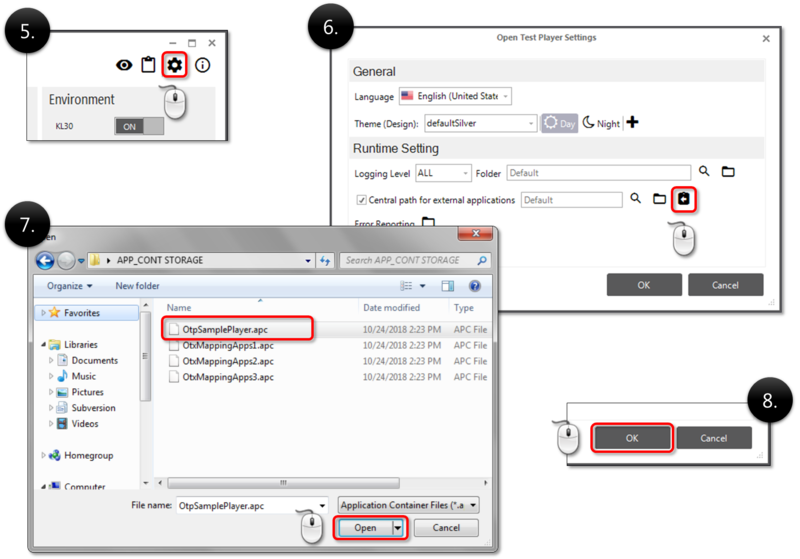
Load the application container (package of dlls to use with OTX Mappings)
You can skip this step if your PPX does not use OTX Mappings (click here for more information about OTX Mappings).
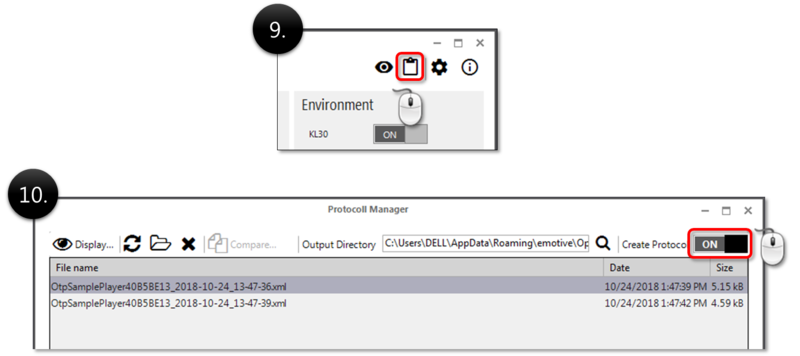
Switch the protocol creation ON
View the OTX test sequences in graphical workflow
Start the procedure command of PPX
Please click on the procedure command.
Stop the running procedure command prematurely
Click on the running procedure command again to finish it prematurely.
Start a playlist command and wait until it completes


